How To Change The Claws On A Treble Hook Model Crab
To learn how to correctly change the claws on your Treble Hook Model Crab, please follow these straightforward instructions below:
Firstly, you will need to obtain a pair of replacement claws from your local dealer or the "Replacement Parts" section, located under the "Products" tab on this website. Ensure that you select the correct size and color claws that match your crab.
.jpg)
After obtaining your new set of replacement claws, start by using a pair of split ring pliers to open the split ring and remove the old claws from your crab. A pair of split ring pliers will enable you to easily unwind the old claw or treble hook from the split ring.
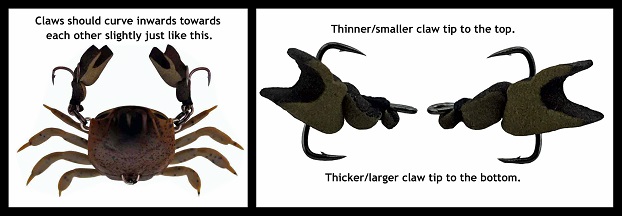
After removing the old claws, the next step is to differentiate between the left and right claws of the new replacement set. Usually, this information is clearly marked on the product packaging. However, if the claws get mixed up, you can visually determine their orientation by closely examining their tips. Each claw has a larger and thicker tip at the bottom and a smaller and thinner tip at the top. By inspecting the claw tips, you can easily identify the top and bottom of the claws, as shown in the picture below.
.jpg)
Once you have correctly oriented the claws, the simplest way to differentiate between the left and right claws is to position them with their tips pointing away from you, and both curving inward towards each other, as illustrated in the picture below. This arrangement ensures that the smaller and thinner claw tip is located at the top of each claw.
Using a pair of split ring pliers, start by opening the split ring on the side you wish to work on first, and then take the corresponding claw. Before winding it onto the split ring, ensure that the hook eye is in the correct orientation, as shown in the image below.
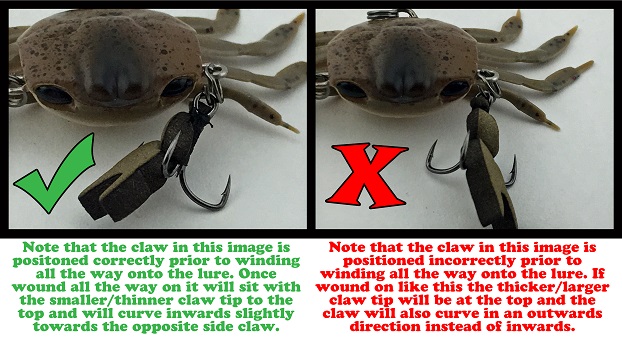
Carefully wind the claw all the way onto the split ring, ensuring that it curves inward with the smaller and thinner claw tip at the top, just like in the image below.
.jpg)
Next, repeat the previous steps with the claw on the opposite side. Once both claws have been attached, your crab should resemble the image below.
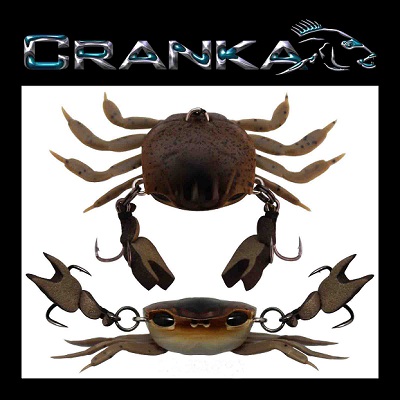
If, after winding the claws onto your crab, it looks like the image above, then you have successfully replaced the claws. However, if it looks like the image below, please continue reading.
.jpg)
If your crab's claws resemble the image above after completing the claw change, it means that you have made one of two errors. Either you have wound on the claws upside down, or you have attached them to the wrong side of the lure. You can identify the problem by closely examining the claw tips. If both claws curve outward despite the smaller and thinner claw tip being at the top, they are correctly oriented but attached to the wrong side of the lure. In this case, unwind them and swap them over to the opposite side. However, if the larger and thicker claw tips are at the top, it means that the claws are on the correct side but have been wound upside down. To rectify this, unwind them one at a time and then reattach them to the same side, but rotate the claw by 90 degrees before winding it back on. Once both claws are properly attached, they should curve inward towards each other, just like in the 6th image above.


